 Guides4Homeowners Useful Information & Guides
Whether you are an aspiring DIYer or a seasoned contractor, you need to have the right tool to get your job done. People who use inappropriate tools they have ended up for any task end up having imperfect results. Tool manufacturers design each tool for a specific purpose. The angle and size of the tool are designed for specific work, whether making a surface smooth or keeping a line.
There are many tools available for removing mortar. You have several options to choose from, but everything boils down to your preferences, needs, price, and the amount of mortar to be removed. Mortar removal also depends on the tool efficiency. If you are working on a small section of a brick wall, you will need high-end tools for removing mortar.
If you are there looking for a perfect tool for removing mortar, stay with us as we will unveil some of the best tools to work with.
The following are our areas of interest in this guide:
How to build a brick wall
When setting up a brick wall, the following steps will guide you to achieve desired results:
Step 1: Start your brick wall at the corners
First, layout bricks at the ends of your wall to start the pillar. The laying out of bricks should be done after foundation preparation. To ensure a straight line guideline for the two bricks from the outside, use a string line.
Step 2: Mix the mortar
Next, heap about five shovels of sand and one of cement onto a board. Mix the sand and the cement until you achieve a consistent colour. Create a central hollow in the mixture and pour water into it. Mix repeatedly until the mixture attains a wet creamy texture. Ensure that the mixture is not too loose for effectiveness.
Step 3: Lay the first course of bedding mortar
This is the step where you lay a thin layer of mortar: about one to two centimetres along with the brick straight line. Start by laying the first brick as you tap it slightly to bed inward. Apply mortar on one end of the next brick in a “buttering up” manner and about it to the preceding one. Repeat the process and use the string line as your guide.
Step 4: Create the brick pillars
Place a brick on the side of the wall where you wish your pillar to start. Raise your wall while ensuring each consecutive course is laid in the opposite direction.
Step 5: Cutting bricks
In the process of pillar building, at some point, you will be required to get rid of half-bricks at specific courses. Cutting a brick requires you to place it on its side and locate the bolster at the breakpoint. Strike the head of the brick firmly using a club hammer, and your brick will split.
Step 6: Keep the pillars one course ahead
Ensure you build a course higher on your pillar than the wall. Always move the string line up as you move to the next course. For a more stretched bond, the end of every brick should be over the middle of the underlying one.
Step 7: Make sure you’re sticking to 10mm mortar joints
The vertical and horizontal mortar joints ought to be 10 mm thick. For standard bricks, the joints from the top of every brick to the top of the one below should be 75 mm.
Step 8: Add a coping stone
When you get to the top of your pillar, you may add a coping stone as you finish. Also, you may opt to make a pleasant effect by bedding bricks on their side into the mortar.
Step 9: How to finish the mortar beds
You will need to use a rounded edge brick jointer to scrape the mortar into the brick joints.
Step 10: Clean up
Using a wire brush, give the wall a gentle scrub to clean up mortar that may have fallen on the floor and bricks before drying up.
How to remove mortar from bricks
Bricks are pretty popular building materials. What makes them attract many people is the texture, colour, and structure of the mortar. Their appearance creates aesthetic beauty, and they are ideal for a good number of projects. Such projects include building houses, floors, fireplaces, floors and many others. Bricks have special properties which require a lot of care.
You will need some sticky mortar for holding your bricks together to make an adhesive. The enormous task is not even holding them together but cleaning the mortar off the brick.
The process of applying mortar can be very messy, especially if the person doing the work has less expertise in mortar application or is not up to date with the best bricklaying methods. After applying the mortar, it will take a little time to dry off, and it is at this stage you will need to get it off your bricks.
The good news is mortar dissolves with acid easily. The scientific explanation for this is that brick is made up of an alkaline material; when the material meets the acid, it will dissolve in acid as it reacts to neutralize it.
The following steps will guide you when carrying out a mortar removing exercise.
1. Grind the horizontal joints first
Grind along the bottom and top of the horizontal joints to clean off the mortar while ensuring you get closer to the brick. Hold your grinder steadily with your hands and grind about ¾ into the mortar.
Always start from the outside as you work inward. Working this way helps you avoid putting much pressure on the bricks at the corner, which can be knocked out of your wall. After you are done with the horizontal joints, work on the vertical one.
2. Knock out the mortar
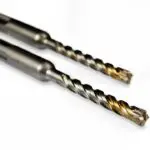
Using a rotary hammer drill, move along the brick joints as you chisel the mortar out. Remember to keep your chisel off the bricks to avoid knocking them out.
Set your rotary hammer drill on the rotating mode to ensure you apply less pressure on the bricks. Also, remember to work from the most outside corners towards the inside. As you remove mortar, the chisel point should always be in the mortar joints as you move the hammer.
There isn’t any formula for removing mortar using a rotary hammer drill; all you need to do is hold it at an angle of about 45-degrees to your wall, squeeze its trigger and watch mortar fall out of your bricks.
3. Clean out the joints
Use a soft wire brush to wipe off the dust and debris out of the bricks’ joints. Check out if there is any mortar left and use the rotary hammer drill to knock it out.
After wiping all the debris and dust off the joint, wash the joints with water. Fill the bucket with water and use a brush to clean the joints. Avoid hosing down the wall with water as you may soak everything, including where you will be kneeling or standing.
Our best tools for removing mortar

Product description
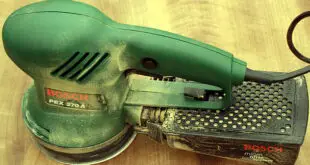
Bosch 601388164 GWS 7-115 Angle Grinder is a professional small-angle grinder with a small scale size grip of 176 mm. The tool is ideal for work that does not require a lot of effort. If you are looking for a tool to remove mortar, this is one of the best tools in the market. It has a flat head that offers excellent working progress, especially in narrow spaces. Also, the tool provides an excellent power-to-grip ratio for progressive use.
The tool’s lightweight and small size nature help you work with it for long hours without getting fatigued. It is also enhanced with an anti-rotative guard for maximum protection. Bosch 601388164 GWS 7-115 Angle Grinder is a powerful tool facilitated by its 720-watts motor. Concerning sound levels, the tool’s sound pressure and sound power levels are 91 dB(A) and 102 dB (A), respectively. For motor cooling purposes, the tool is developed with air inlets that allow the motor to cool for a longer lifespan.
Main features
The tool has unique features which make it stand out amongst the mortar remover tools. The following are the tool main selling areas:
- The flat tool head makes it easy to work on narrow gaps or spaces.
- It is a lightweight tool that allows you to work for long hours.
- It has a powerful motor for effective and efficient mortal removal.
- Bosch is a well-established brand, and this enhances buyer confidence.
Why we have chosen it
We tried several tools, and this one impressed us the most. Its ability to penetrate narrow spaces and remove mortar controllably amazed us. Also, the tool weighs 1.9 kg which means you will not get exhausted working with it. You can work for long hours to cover a large volume of work.
In addition, the tool is manufactured by the Bosch company, renowned for its high-quality products. We have tried other Bosch products, and at no time they have ever disappointed us.
Read reviews
When choosing tools for removing mortar, you will find a number of them. However, not all tools will deliver as you would wish. If you do not want to take risks, read reviews and know what people say about each tool.
This tool also has some reviews. Read both negative and positive reviews to get both sides of the tool. Reading reviews will help you make an informed decision when purchasing this tool.

Product description
This is an interchangeable bricklaying tool with four different sizes: ½, ⅝, ¾, and ⅞ inches. You work with a barrel that matches your requirements or the one you prefer. The tool has an ergonomic and comfortable handle that provides easy management and handling. For increased lifespan and durability, the jointer is developed with aluminium casting with steel barrels.
The tool comes with a storage pouch that helps to keep the tool in a safe place. The tool is perfect for finishing mortar joints and ensuring you achieve desired results.
Main features
With so many tools for removing mortar in the market. This tool outshines many of them in the following ways:
- It has a cast aluminium handle with an enhanced knuckle room for easy managing and handling of the tool.
- The tool flexibility makes it stand out as you only need to change the steel jointer barrels to suit your requirements.
- It comes with a storage pouch that helps in keeping the tool safe when not in use.
- The aluminium casting and steel barrels increase the tool durability and lifespan.
Why we have chosen it
The main reason why we made the tool appear on our list of the best tools for removing mortar is its flexibility. With its four different sizes, you can change to whichever suits your needs in the process of eliminating mortar from brick joints.
Another reason is how easy it is to work with this tool. Its handle has an ergonomic and comfortable design with a great knuckle room. You will not strain at all trying to find the best angle for holding the tool properly.
Read reviews
Amtech G1700 4 Size Interchangeable Brick Jointer has great reviews. Most users seem to have been satisfied by the services the tool offers. Yet, some critics find the tool not helpful.
To find a balance and what you need from the tool, it is good to read all the reviews to know if it satisfies its user in your area of need.

Product description
The Irwin cutter is designed to use the mortar rake kit to replace the traditional methods for removing mortar, such as cutting discs and powered mortar chisel. The mortar rake is a bit fast and less intrusive to the bricks than other methods. It is quite effective for both vertical and horizontal joint clearing.
Remember that the cutter should be used hand in hand with an angle grinder and an adaptor ( 10507234). The tool has multiple applications, including the installation of pipes, cables and switch boxes.
Main features
After using the Irwin 10507232 4 Cutter Mortar Rake, we picked a few of the main features that make it sell more than other tools.
- The tool is available at an affordable price.
- The tool is relatively flexible as you can also use it for pipes, switch boxes, and cable installation.
- This tool enables you to complete your work faster as it is fast.
- It is less intrusive to the brickwork surroundings; hence you can work without having to worry about any damage.
Why we have chosen it
Getting a tool that is designed to replace some traditional tools for removing mortar is incredible. The tool is quite effective in its work and removes the mortar without damaging the brickwork.
Sometimes you may decide to install or reinstall your house cables, switch boxes and pipes. With this tool, you will be able to do all the work as it is also developed to handle such tasks.
Read reviews
Reading reviews about this tool will help you get more information about it than we have provided here. Reviews will give you different perspectives from different users. For this product, you will get all kinds of feedback, from positive to negative. However, positive reviews outdo the negatives.

Product description
Rolson manufacturer offers a wide variety of tools ideal for a DIY enthusiast to professional contractors. Ralson seal enhances buyers confidence as you are assured that you are buying a high-quality product with international standards. The manufacturer aims to improve and increase their catalogue by introducing reliable, exciting and innovative tools.
The tool has a flat surface for a flat and smooth performance.
Main features
So what attracted us to the Rolson 52245 Smooth Plastering Trowel? Below are some of the attraction points.
- It has a tempered and hardened spring blade.
- It is developed with a cushion grip with a banana-shaped handle for enhanced control.
- The tool is ideal for mortar cleaning and finishing to create a smooth surface.
- It is a lightweight tool.
Why we have chosen it
When applying mortar for plastering or on the floor, you will need to make your surface smooth by removing some mortar. This tool helps you get rid of mortar that hinders your surface from being smooth.
Read reviews
Different people have different opinions on each tool available in the market. Rolson plastering trowel is no exception. In its review section, you will find all manner of feedback. If you take your time to read, you will have acquired intensive information about the product.

Product description
Cottam XD Heavy Duty 4 Row Steel Wire Scratch Brush is an ideal brush wire for cleaning out mortar joints and hard surfaces. Developed using quality material, the brush usage icons enable the buyers to be confident when choosing the brush.
The brush is developed with a four-row heavy-duty steel wire scratch, and a plastic handle to remove paint, mortar, coatings, grout, debris, and rust. The brush’s head has a curvaceous design flow from its handle to the head for easy cleaning.
Main features
The following are the main selling points and features of Cottam XD Heavy Duty 4 Row Steel Wire Scratch Brush:
- The brush is tough for stubborn surfaces cleaning and preparation.
- The brush can penetrate narrow joints to clean mortar.
- It has an elongated handle for comfortable and precise tool control.
- The curvy design makes cleaning easy.
Why we have chosen it
When removing mortar, at some point, you may need a brush. We had many options to choose from, but we picked this one for its effectiveness in what it does. It has four narrow rows of steel which are very efficient in cleaning mortar from your wall.
The brush has great reviews, which prove that other people have been impressed by the brush just like us.
Read reviews
Make an effort to look at the reviews before clicking the “ Buy Now” button. Reviews will help you know whether the brush has served people how you would want it to serve you. From there, you will be able to decide whether the brush is for you or not.
We have given you a guide of the best tools for removing mortar available in the market. We hope that with our five best tools you will consider which one suits your requirements. You can even decide to buy all of them for efficiency.